Servo Motors
Servo motors are small motors that can turn to a specific angle between 0 and 180 degrees. Servos are very easy to connect to an Arduino and begin using.
Wiring Servos to an Arduino
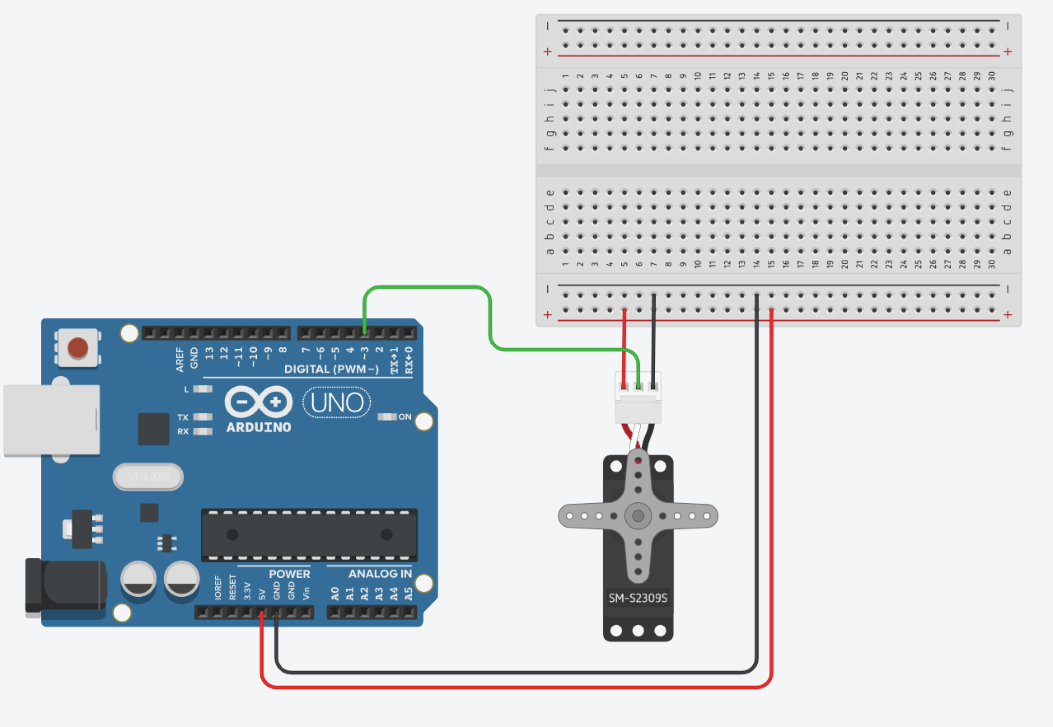
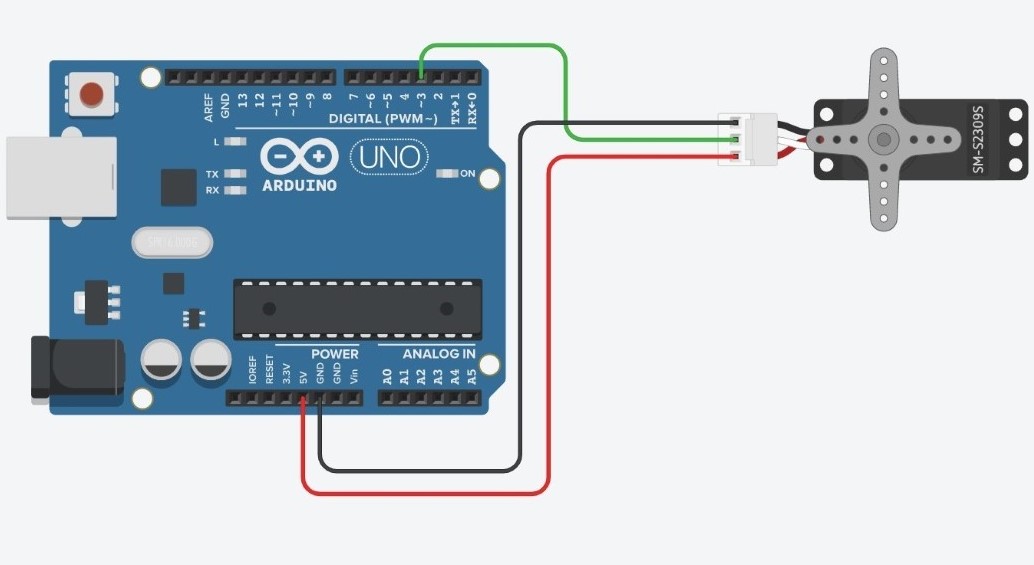
To connect a servo to an Arduino, simply connect the two edge wires to the 5V and GND pins and the center wire to one of the PWM pins. You do not need a resistor to do this. Here is an example of a servo connected to the arduino on pin 3 with and without a breadboard.
You will want to use a breadboard if you are using the 5V pin for more than one device. For example, you might need to connect both a servo motor and a light sensor to the Arduino, which both need the 5V pin.
The Servo Library
To use the servo library, you must first put an include statement in the beginning of your code:
#include <Servo.h>
This will allow you to use the functions from the servo library. To begin using your servo motor, you will need to create a servo object in your code. To create a servo object, write:
Servo servoName;Create the servo object by first typing the word Servo (capital ‘S’), then assigning it a name that you will use to refer to it later (you can think of this like declaring a variable). In this case, the name is servoName. You will put this line of code right after the “#include
void setup
Within the void setup portion of your code, you will tell the Arduino which pin the servo is connected to with the attach function:
servoName.attach(3);This line tells the computer that your servo motor is connected to pin 3.
void loop
Within the void loop portion of your code, you will tell the Arduino to move the servo to whichever position you want. To do this, use the write function:
servoName.write(90);This function tells the Arduino to turn to the position 90 degrees. This doesn’t mean that the Arduino will turn 90 degrees from where it is now. It will turn to the position that is 90 degrees from some starting position. After you write this code you will need to include a “delay();” statement to give the servo time to move.
Sample Code
After uploading the code successfully, try changing the value within the function “myServo.write();” to 45. What happens?
This program tells the Arduino to rotate from 0 to 180 degrees by turning 1 degree at a time. In each iteration of the for loop, the Arduino increases the position by 1(“pos += 1”), tells the servo to turn to that position(“myServo.write”), then waits for the servo to turn that one degree (“delay”). To change the speed, simply change the number within the “delay” functions. To change the angles of rotation, change the “0” and “180” values inside the for loop to whatever you want it to be.


